Hi There,
I am making a new journal and I was asked by Alicia to create a Step By Step Tutorial to go with it, for a lovely group of ladies, that are in Papercraft Secrets group on FaceBook. If you don’t know my favorite color is Blue and that is the theme of this one 🙂 A Junk Journal can be used for many things like a memory book, an art journal, a recipe book, for keeping ephemera like tickets, postcards, receipts, their uses are limitless!!!
I hope you enjoy my step by step and you might like to play along to……………..The first thing you need will be a few things from your craft stash to make it which is listed below………..
We are going to use cereal or some sort of box/cardboard that already has a spine. You can also use a book cover with its pages removed. I like the softness of the cereal box but a harder cover is great also. If you are new to making them I would start small for your first one to get the hang of it, but that is up o you. A good size is 5×7 or 6×8 to start with, but you can be adventurous if you like! I am partial to large journals with big spines, like the one I am showing you here.
SUPPLIES NEEDED FOR COVER
You only need basic items like scissors or a cutter, double-sided tape or glue, your box, and some extra cardboard or chipboard to make the covers. I like to use the backing of paper pads, which is still a good strenth but not too stiff. For the spine, I like to use the chipboard as it supports the pages inside.

STEP 1 – Open the box up by cutting one edge, then you can either glue the tabs up or cut them off. I like to cut them off then use my cutter or ruler and blade on my cutting mat, to get a nice straight edge. Cut it down to the size that you are comfortable with. The spine on my box is quite large but a smaller box will, of course, give you a smaller spine. Depends on how many pages you want in your journal to play with 🙂

Now you have the cover measured and cut you can cut some light chipboard/card to a smidge smaller than the size of your covers. don’t forget your spine piece!
My covers are 8×10, but I may cut them down a smidge yet. I cut my extra cardboard a 1/4 of an inch smaller.

STEP 2 – Next you need to glue on the extra pieces you are using to strength your journal 🙂 I like using double-sided oh so sticky tape that I get from Craft Online. It is the best I have found so far 🙂
Use the double-sided tape then go over with a glue stick. Just make sure you leave a little bit of a gap and don’t put the edge of the chipboard right up against the spine as you will need a little room for it to open and close. I always do the covers and the spine by cutting them a little smaller than what you made the covers.

STEP 3 – This step is to strengthen your covers a little with some cloth or duct tape. I get mine at Bunnings. You could also use fabric, etc. You can use whatever color suits your journal. I know you can get printed ones also. I like either white or black for my journals.


I use my craft mat to lay it on, but a non-stick surface is great too. I just add lengths of the tape to cover the spine and where it folds. I make the tape longer than needed and then it gets folded over on the other side.

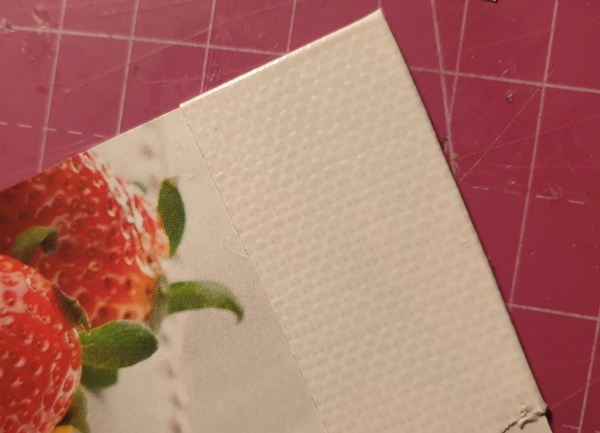
Fold the tape around the edges as shown above and make sure it’s well adhered.

Now add tape on this side over what was there down the spine and make sure it’s stuck down well.

I like to put some tape on my corners so they don’t get torn or roughed up with handling. I just put a piece like this then cut across the corner to make a triangle. I then fold the pieces into the inside of the cover.
This creates a nice clean looking corner. If you want you can go along each of the edges of your journal to protect them. I have done this on most of my other journals.

Now, your cover will look like this and be nice and sturdy. It doesn’t matter what it looks like as you will be covering it up and embellishing it. You can see the spine on this one is about 3″ wide as I like a chunky journal 🙂 I hope you are enjoying my Tutorial so far 🙂
Stay Tuned for Part 2 which will be up tomorrow for you.
Happy Junking
Kerri x